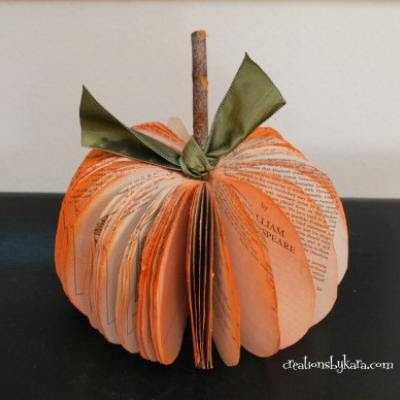
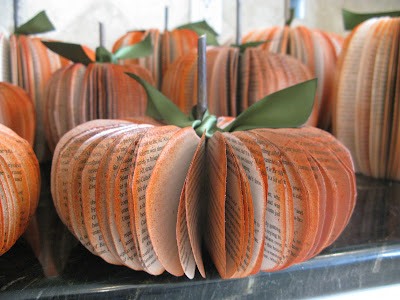
Keeping in mind the time and financial restraints, I ended up taking ideas from the book page pumpkin and the basket of painted pine cones. This website has a tutorial for how to make the pumpkins from an old book: http://www.creationsbykara.com/2011/09/book-page-pumpkin-tutorial.html
 It's not hard, just takes a little time to cut all the pages (especially when you're making more than just a couple pumpkins at a time). I used some paperback novels in different sizes that I got at the little books for sale area in the library. I got something like 12 books for about $5. (I learned not to use dictionaries with really thin pages for this project, because the pumpkin won't stand up right, but normal paperback or hardback books with the covers removed work fine). I found out one thing that the online tutorial for this project does not suggest that makes a big difference: cut the outline of the pumpkin so that it goes right to the bottom of the pages of the book, so there is a flat base for the pumpkin to sit straight when you are done. If the book pages are pretty stiff, it doesn't matter too much, but if the book pages are a little thinner then if the bottom of the pumpkin is rounded it might not sit straight.
  I used sticks from the back yard for the pumpkin stems, and one roll of ribbon was just barely enough for all 13 pumpkins I ended up making. I too used spray paint, but I thought it would look cool to use a can of orange and a can of bronze spray paint. I think they turned out looking really nice, but I'm not sure if it was really worth it to pay the extra couple of dollars for the bronze spray paint -- on the pages of the book the bronze looks more like just a light brown than a shiny bronze. But I do think it looked nice to use the orange and brown together, so the pumpkins weren't all the exact same shade of orange.
  Oh, and I made one pumpkin to start and see how it'd turn out before I made the rest. After spray painting that first pumpkin I had a little paint on my fingers which washed off alright when I washed my hands afterwards. Later, when I made the other 12 pumpkins and spray painted them all at once, I ended up with more than a little spray paint on my left hand, and it would not come off with washing no matter how hard I scrubbed. I had to rush to pick up Camden from school after painting them, and I was embarrassed to leave the house with my hand painted shiny orange, but I had a sweatshirt so I just kept my hand in my pocket. Anyway, I was glad to find some paint thinner in my parents' garage when I got home, which took it right off -- so, if you happen to do this project and make more than one or two pumpkin, you might want to have either some paint thinner or some plastic gloves on hand.
  And I decided to collect pine cones from the sides of the roads wherever I could find pine trees growing that week before the big party. 41 tables sounded like a lot, so I collected as many pine cones as I could find (I think I ended up with like 8 garbage bags full of pine cones). Then I dumped them all out on a tarp on the driveway and painted piles of them red, orange, and gold. We ended up putting the fall-colored pine cones in baskets as some centerpieces, and setting them along the center of some of the long tables, and that was a really inexpensive way to decorate. Plus I drove past a really pretty tree with bright red leaves falling on the ground near Camden's school the day before the Thanksgiving dinner, so I stopped real quick and gathered up a little bag of the red leaves. Anyway, with the leaves, pine cones, and paper pumpkins, it actually turned out really nice looking. It's too bad we were so busy setting up for the dinner that we didn't think of taking any pictures of the tables at the church after all the decorating was done. I think it all looked nice, and the paper pumpkins were the cutest part of all.
 But we got lots of nice comments about how things turned out, and tons of people came up and asked me for details about how to make the pumpkins. Plus, now I have a bunch of cute pumpkins for our house for next fall -- I've never really had much in the way of Autumn/Halloween/Thanksgiving decorations. And I plan to pick out some of the cute, small pine cones to keep and put in a basket or two around the house -- maybe just the red, gold, and brown ones though, I wasn't especially fond of the orange pine cones. But right now we've still got lots of bags of painted pine cones in the garage. I still need to pick out the ones I like, and then give the rest to the boys. Kolby had the idea of taking them to the fort, then he wants to make a color-coded map of the fort, showing where all the different colored pine cones are. I thought that sounded like a very good use for all those bags of colorful pine cones. :)


No comments:
Post a Comment